Monday, December 8, 2014

Upcycling Veneer Furniture

So I did it; I finally accepted the fact that we are "for sure" done having children. Many of you knew this bc I told you I was done. A few of you who really know me, knew I was having a very serious internal struggle. I love kids. Um, well, I love MY kids. And I DO want a full house. I want big holidays, full sports schedules and no time to watch what I want on the TV. I know; I'm crazy. It's ok if you think that as well, but I really wanted a little girl. I'm totally OK with having two boys (as if I could ever just send them back)- they love me so much. Much more than they love sleep apparently, but still, I'll take it. It's not a forever thing. But they're boys- no bows, dresses or Barbies. No trying on my make-up and shoes (although they BOTH have eaten my make-up and used my shoes as weapons...say it with me now, "BOYS!!!") or letting me do they hair...😭 but... Kids are expensive and we are on a single income for now. Plus, the whole pregnancy, labor, delivery and recovery thing does NOT agree with me. Period. 

So, I bit the bullet and sold everything baby related. The last items to go were the crib and changing table (and they went to a wonderful friend which really helped. Yes, I cried over inanimate objects. Even before I sold them. It's hard to get rid of things and anyone who tells you otherwise, is a dad.). The baby's room doubles as a guest room and up until now, it looked like a baby's room that just so happened to have a Queen bed in it. 

Let's move forward. The baby has no furniture. I have a creative mind. We are on a budget. Enter: Pinterest. The very Bain of my existence. I love Pinterest just like every other person out there, but it really gives me false hope. Maybe I'll post some of my Pintrocities later on. Or maybe I'll just keep that in the back of the closet next to my old ASG {my mom and dad's old gymnastic center} T-Shirts fr when I was 10 that I keep holding on to in the off chance I learn how to quilt... I'm keeping them forever...

Ok, so in walks Pinterest and she says, "Hey Becca, don't you have some old furniture you can Upcycle? I know I remember you posting about it a couple
Months ago. Why don't you just click the search engine again and see what pops up, eh? I believe in you."

Bitch. 

But I did it anyways and I'm so glad I did! I have a dresser from when I was a kid and some night stands from when my parents first got together. And I'm SERIOUSLY pissed at my husband for making me get rid of the matching armoir bc it would have been absolutely stunning. Here they are:

(Totally 80s, but I really do love these night stands)
(Don't mind the baby...he follows me everywhere)

These DEFINITELY need a redo and I just thought, "hmmm, antique bottom and dark brown top?" My husband said no, so, naturally, I tried to prove him wrong. Curse my inner competitiveness. 

What you will need:
Brushes (decent quality)
Old rag
Primer (water based)
Paint (water based: if you want to see brush strokes, use an acrylic otherwise, use a latex)
Stain (oil based)
Sealer (latex, glossy)
A paint stirrer
A pan can key 
Paint thinner (for cleaning your brush)
3-5 days of times

What you might need:

Wood filler
Sand paper
Hand sander

What you definitely do not need:

Your husband

1)PRIME!!! Since I am not staining it (in the traditional way), I did not need to sand. The primer I purchased stated specifically that there was no need to sand. So, I did not.
The night stands were a dark brown already, so I timed the front and sides, two times, and left the top alone. With the dresser, I primed everything once bc it was a medium gray. Let dry in bw coats. (Water based = clean with soap and water)

2) Paint! I went with a cheap Paint + Primer combo in a flat finish (it really doesn't matter what you pick bc your Sealer is glossy). I grabbed a gallon size bc I also use white paint as a base for all my paintings 👍, but I only grabbed a small can of the dark brown. I used 1 coat on each. I wanted to have a faux wood grain texture so I was careful to keep my lines straight so that the stain had something to grab onto. It's your call though- you can use a brush or a roller. (Clean brushes like before!)
(Already it looks better)


3) Stain: for the front and sides, I used a brush on, wipe off approach. It worked better on the night stands, but maybe that's also based on wood type? Idk. I know nothing about wood. My apologizes. Anyways, so try my approach first and if it comes off looking lighter than you want, try it again and leave it on for a bit longer. That's what I did for the dresser. I brushed it on a drawer, did a second drawer, then wiped off the stain from the 1 st drawer. Looked great. For the tops of the night stands and dresser, I did not wipe off the stain. It looked fantastic and (in all honesty) I wanted to see how it would turn out. Trial and error...(oh, this is an oil based stain so if you want to keep your brushes, clean them with paint thinner)
(Left: with stain; right: without)
(Left: after I wiped off the stain; top right: the stain I used; bottom right: with stain and after it has been wiped off)

4) Sealer: I used a latex clear coat, high gloss sealer that came in a 1/2 gallon. I figured I would use it elsewhere... They also came in spray cans, but I decided that would be an awful choice for us. Anyways... So I went over every items once. It dries in an hour; able to handle/move it in 2 hours; able to use in 48-hours. (Sealer is water based, so please thoroughly clean your brush with soap and water or else your brush will be hard as a rock in an hour...)
(It's so happy to be in its new spot)


Gosh, I pretty much feel unstoppable. Well, not really. But I DO want to Upcycle freaking everything in my house... It's a sick obsession right now. I redid my glider 
(Sad, sad little glider. You have too many memories on you to ever get rid of... I love you)
(Finished!! Everything is able to be taken off and washed. And that's a great thing too bc this little man does NOTE have his diaper on...)

I would love to do a tutorial on this, but I am terrible at sewing and would not know where to begin. Sorry, you'll have to admire from afar... Or go on Pinterest...



Monday, December 1, 2014

Design On a Dime: Christmas Pictures

If you're anything like me, you love to go to Michael's (& Hobby Lobby). A lot. And you probably married someone like my husband... The Jew (I can say this bc I am, in fact, 1/2 Jewish. He's Catholic. Dad's Christian. I'm a Chew. Judge away. If you can't laugh about that, I'm sorry but we can't be friends.)

So my Scrooge put a limit to our spending each month which has REALLY got me prioritizing. It's crazy. Thank God for Pinterest, but even then, I'll look and think, "holy crap, there's no way her house can look like that without being broke"... 

Then, I had an epiphany. 

I remembered my inner Jew. I thought, "Hell, I'm creative. I can do this without breaking the bank!" And I did. 

So my Pinterest inspiration came in the form of fabric-covered canvases for every holiday. Now, I do love me some fabric and canvases... But it's expensive and I have kids. Boys, actually, so you know whatever I make needs to be cheap bc it is not going to make survive them. 

My solution: cover existing picture frames with wrapping paper. I wish I had taken step by step instructions, but it's pretty self explainitory. Lay the picture frame "picture-side down" and wrap the frame. Do not wrap the back (or if you do, leave the picture hanger brackets exposed). Then hang it up! 


Not too shabby!! I got the wrapping paper and tape from the Dollar Store... So this whole thing was on about 75¢

Be sure to post your creative projects on to MOOSEink's FB page!!!

Saturday, November 29, 2014

DIY: Burlap Wreath- Tutorial

Burlap Wreath (method 2)

If you follow my FB page (MOOSEink), then you saw another wreath I made. If not, here's a picture (sorry, but I'm not using my Canon, just the iPhone so the colors are not amazing... Nor the quality. Don't judge) 

This wreath used a similar method to the one I made tonight. Once I find the link to the blog I used, I will insert it here. 

Ok, onto the tutorial. 
HERE'S WHAT YOU'LL NEED:
•18" wire wreath ($5 @Michael's)
•10yd burlap ($7 @Michael's unless you buy on sale... Which I did!! Woo-hoo for $2.50!!)
•7-10yd deco mesh (I had a coupon but I think it was $5 @Michael's)
•5-10yd ribbon (I used some left over fabric I bought to make a scarf)
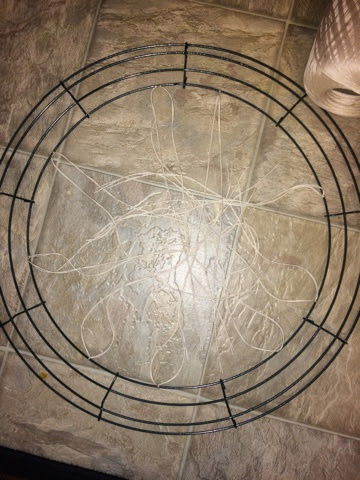
• roll of twine/thin ribbon/yarn -or- 18 pipe cleaners

In this tutorial, I used yarn bc I ran out of pipe cleaners and I was SOOOO not going back to Michael's. But Becca, how did you run out of pipe cleaners? Didn't you buy a bag that had roughly 100? Yes, yes I did. As a matter of fact, they were all present and accounted for before I ran to Michael's this morning and left the boys with my very capable husband. Somehow, in a 2 hour time span, I went from having a little over 80 pipe cleaners, down to 4. Where are the others? Hmmm, good question. They are probably hanging out with my missing hair dryer attachment and remotes. I will find them in 18-months when we move. Until then, I'm McGuyver-ing it with yarn. 

Sooooo, if you're like me and have a ton of yarn just laying around and want to use that... Go for it. If you're using yarn, cut 36 pieces. If you're using pipe cleaners, get out 18. Yarn in bold; pipe cleaners in Italics. 

Yarn:
 2 strands at a time, double knot the yarn to the inside of the wire wreath, making sure there is equal length on both sides. 1 per section. Do the same for the outside. 

PC: Loop PC through wreath, making sure there is equal length on both sides. Twist once. Start with inside. 1 per section. Do the same for the outside. 

And that just screams to my boys, "YOU MUST TOUCH ME NOW AND SWING ME AROUND UNTIL YOU HURT ONE ANOTHER AND DRIVE YOUR MOTHER INSANE!!" So, I waited til they went to bed. Apologies. 

Next: Start in the innermost wire: take your burlap and tie it with a double knot -or- twist once 


Add the deco mesh, using the same technique. 


Fantastic. Now, grab about a hand's length down from where you attached your initial piece of mesh/burlap and tie it or twist it together on the next section. 


If you are using the yarn, it'll feel loose. If you are using PC, you won't have to work as hard to make it secure. Continue this process all the way around the innermost wire and then attach your mesh/burlap to the outermost wire. 


Starting to see it coming together? Keep it up! Using the same process as the inner circle, attach the mesh/burlap to the outer circle. 

You will have some left over. A lot, actually. If you are like me and hate to waste any fabric, ever, continue on. If you don't mind wasting, the you can stop and move on to the ribbon part. 

All others, here you go. 

Using the same technique, make the mesh/burlap go in between the two circles and attach using BOTH yarn strands -or- PC from the outermost and innermost parts of the wreath. 


It's a freaking CRAZY concept, but i'm telling yeah try it. Continue through the middle circle and tie off at the end.


Looks good doesn't it? Now flip it over and tie the strings together or twist the PC around.


Now you can stop or you can add ribbon. I had leftover fabric and decided to try using that. I did not like how the strings left very noticeable areas on the wreath (even after I fluffed it), so I used my fabric to hide the visible string. Turn your wreath so the right side is facing you...I weaved the fabric over the string and then under it for each section, making sure I kept my fabric in the middle circle. I ended up having to cut two strips of fabric and tie them onto the wreath. You can do that or you can use hot glue. Or you can be really crazy and do both. 


Go all the way around the wreath and then tie off OR make a bow. I opted for a bow, but I might end up stitching together my fabric with my left over deco mesh to make the bow stand out a bit more. Who knows. Actually, now that I'm thinking about it, yes. That is probably what I'm going to do.  


And there you have it. Fluff out each portion to make it appear bigger. Add cute things to it too- just know, that's typically where these things get expensive... And if you can see through your wreath in some areas, don't worry, no one is going to notice the wire from the street. Go pour yourself a glass of wine and have your husband, boyfriend, girlfriend or whomever witness your awesomeness. For real, you deserve a pat on the back. 


If you make a wreath using this technique, please, leave a picture on my FB page!! I want to see them all!!


Thursday, November 27, 2014

A Thanksgiving of Status Updates

Our Thanksgiving was awesome! Don't get me wrong, I missed our crazy families, but not having to get dressed, clean or travel anywhere was simply fantistic. I knew it would be. As usual, there wasn't a dull moment in our house. Since I don't want to bore you with back stories of every single thing, I figured I'd do this Facebook/Twitter-style and limit myself to just a couple sentences. 


1) nothing like having the boys let you sleep in until 8am to really make you feel old. Seriously, I have this nagging feeling that I've wasted half the day! #forcedtobeanearlybird #iamofficiallyold

2) made waffles for breakfast. They were delicious. The baby would know this too if he would eat a little more than just the whipped cream. #babyisafatkid #hismomcanCOOK!


3) ah, thanksgiving. A holiday where you are supposed to be thankful for what you have. Instead, my boys are spending it fighting over a $2 toy made from a yard stick. #bros4life #thanksgiving


4) been slaving away making a million and one casseroles while my husband is on his laptop. The boys are running around him, screaming. And in go my headphones.  #hecantmakesides #helikesmeat


5) so I'm watching my friend's house/dogs for her while she is away. This means I can wear whatever I want over to her house bc she's not there. So I wear my pjs (gray long johns, a Mizzou shirt and black crocs) with my favorite apron on top ("I gossip better than I cook" it's funny, you can laugh). Sadly, other people had to see me run over to her house wearing this. And to my neighbors, I'm sorry. #desperatehousewivesofAL #mastercheftakesnobreaks  

6) finally sit on the couch to catch my breath and Steve asks me to help clean the dishes...in that tone...  #notinyourlife #IfMamaAintHappyAintNoOneHappy #YouBetterBelieveTHAT #nopicture #noonewantstoseethat

7) my first attempt at making a cheese cake went about as well as I expected. Butter dripped out of the cake pan, into the oven and I almost burned the house down. There was smoke E V E R Y W H E R E. We opened every window and blew fans at every entrance and just as I was starting to go over what I was going to tell the firefighters when they arrived, the smoke cleared and Steve and I could breath again. Luckily, the boys are still short and didn't have to deal with the smoke. #blondmoment #whenovensattack #smokeout

8) we made a TON of food. It was all delicious. Like REALLY REALLY delicious. I was almost sad we had no family here to share it with. Good news: this meant that my picky eaters had at least one thing on their plate they would eat. Also, everything can freeze (except the salad...but I made 1/4 the normal amount and it'll be gone in about 36 hours). Once I post all the recipes, I'll put up links here as well. #mamasabaker #nofamilyhere #innerfatkidcomesouttonight


9) both boys went to bed early so I made a wreath. I'm probably going to pat myself on the back for it too for at LEAST 2 more days. #artattack #momarted #openthewindow


10) bought all my presents online so I don't need to go Black Friday shopping!!! I was going to go to Michael's, but I decided I didn't want to put normal clothes on... Or a bra... Well, my undershirt has built-in support and let's face it, big mama isn't actually so big. So I think that counts as wearing a bra. #suckitTribeck #hangingfree #thisIsMyHappyPlace

11) put up ELMO. Jman has already told me I'm lying bc ELMO wasn't in his Elf on the Shelf book... But Elmo brought candy so we'll see who has the last laugh. #itsgonnabeme #n*syncforever #mwahahahaha


12) going to bed knowing I'm making monkey bread for breakfast. Crap. All that food has stretched my stomach and I'm already salivating!! Goodnight and stay safe if you're Black Friday Shopping!!! #tistheseason #BsBeCrazyYo #BlackFridayIsTheDevil #notreally #GrabThemDeals


Wednesday, November 26, 2014

Elmo on the Shelf

Day 1 of no Facebook was actually stressful. It was weird. I had anxiety (I'm not ashamed to admit) like, "what the hell is going on with my friend's lives?!" 

Or something funny would happen and I wanted to post it right then and there... Then remembered I gave up FB for awhile. I'm telling you, it's like being angry at your best friend, then having something eventful happen to just moments later and you end up getting pissed at yourself bc you want to tell your best friend, then can't bc you're in a fight. I'm sure it'll get easier as the days go by, but I feel a little like a recovering addict (ok, it's not the same thing at all, but I've never been addicted to anything other than Oreos and Caffeine so cut me some slack). 

For instance, I went to the gym today (if you are my FB friend, you'll remember how the chicken nugget incident with Jman last week and my vow to work out every day...) and for realz, my kid DOES NOT STOP TALKING. Ever. A lot of his questions are relevant to the current conversation, but then he throws those curve balls and you think, "my gosh, how did his little brain come up with THAT question?!" I used to listen to Pandora in an effort to have a little peace and quiet while we drive, but no, it had to stop. One can only listen to Toddler Radio on Pandora for so long before one snaps. It's true. 


So today, our conversation consisted of Elmo on the Shelf. I tried the typical Elf on the Shelf, but, alas, J was afraid to even walk by it. So it had to go. Luckily, this happened at my dad/step mom's house so I didn't have to find a way to return it to the store after I told him it was magical. Lol. So anyways, we decided ELMO on the shelf was a safer bet. Now, here's the thing about Elmo, he just does not like to make messes. He knows that I have to clean up 99.99% of the messes in our house and he just wants to go easy on me. So every night Elmo goes back to SANTA and tells him if my boys were good or bad. The next morning, Elmo hides and waits to be found by the boys. If they were good the night before, they each get a piece of candy before breakfast. If they were bad, they get nothing. (Mwahahahahahahahah) Anyways, so we're in the car and J wants to know why Elmo is reporting to Santa and not the elves. I told him all the Elves are super busy making the toys for Christmas so SANTA hired Elmo to do this for him. He thinks about it and asks a TON of questions: well, how does Elmo get to Santa's house? Teleportation.  What is teleportation? Going from one place to another without having to drive, walk or fly. Your body gets blown into a billion pieces and then gets put back together at the new place you want to go.  *crying ensues bc he doesn't want to get blown up* When are we seeing Santa? After Thanksgiving. Well, you bet your bottom I'll be asking if all of this is true.

Shit. 

Well, guess I better hope he is so "in awe" of the big guy that he forgets and I'm off the hook... Or let's hope the Santa we see is amazing at rolling with it and goes along with my story... 

Ah, in other news, the baby is talking more and every time he says something to me, he likes me to repeat it. If I'm correct in guessing what he's saying, he'll give a great big chuckle. And damn it if it isn't the cutest thing I've ever heard. We read his favorite book tonight (it's a Farm book that has everything about a farm illustrated. Cool book.) normally, G turns straight to the food section and we spend the whole time going over what each food item is multiple times. Then, he usually realizes this has made him hungry and he needs a 2nd dessert. So I'll get him some crackers and he goes to bed. Well tonight, he just wanted the animal sounds page. I video taped it and sent it to my family. They had to see it. I would say an animal sound and he would repeat it. Not just that, but if I shook my head or did something I don't realize I'm doing, he would copy that too. Ah, Geesh. He's. Little shit, but when he does cute things like that, I forget all about how he drew on the wall with my charcoal pencil, or stuffed mashed cauliflower up his nose/on his hair/in his ear, threw numerous tantrums for only God knows what and slapped the dog (yes, he was out in time out a lot again today). And now, that little guy is out cold and looking so peaceful I can't help but love him. Alright, his slate has just been wiped clean. Hahahah. 

On that note, I'm going to get off here and try to ninja my way out of his room before he wakes up. I just put a new door-handle lock on his door so if I am able to get out without having to text Steve to come open the door, I'm grabbing a White Chocolate Covered Oreo (they just came out with them this month and I have ZERO self control... I believe j already mentioned that before...) and getting back to my drawings. Laundry can wait and so can cleaning my house. It'll get done once the holiday season is over. Ha! Who am I kidding, it'll get done the next time my In Laws or Step Mom come to visit me. 

Becca OUT!!

Tuesday, November 25, 2014

RIP Ferguson and Facebook... The blog must go on!

So, after being called a racist because I am white and apparently that's how "all whites are", I have decided to leave Facebook for a little bit. Sadly, I have a ton of opinions and rile easily. It's a curse I've inherited from my MotherInLaw. Hahahaha. However, my boys continue to be hilarious so I will be starting a series basically consisting of short stories that happen day-to-day. 

Being a woman, I love to talk. So I am happy people still want me to continue my blog! Thanks everyone!! Hopefully, I'll be able to update this so much that I won't need Facebook anymore!! I'll also be on Instagram, under the name of my art business, MOOSEink. I'll also be posting to MOOSEink's Facebook page with all of my art projects! Can I get a heck-yeah!?

Ok, enough of that...let's get to the cream filling. And I've got Mega Stuffed stories to tell y'all. 

This year has been a roller coaster of emotions for me, from being stalked by a maintenance man to having so many weddings, we were back in STL at least once a month. So to say I'm happy NOT to be traveling home for the holidays, is an understatement. Imagine if you were told cookie dough had no calories... That's about how excited I am. And it's a good thing we're not traveling, bc my boys have been T E R R O R S. 

My day consisted of making verbal threats to my boys and having quite a bit of those threats result in "time out". *gasp* say it isn't so!?!?! Well, it is. I'm a fun-sucker, what can I say? I actually just got a basketball thrown at my face by the baby as I was typing. Little stinker is being a little terror. So, time out for the 5th time today. 
And I mean really, LOOK at that sweet face. He would never, EVER be a bad baby... Ha!

He doesn't understand the true meaning of Christmas yet (... You know the one where parents make empty threats about calling SANTA to tell him the kids were bad so NO PRESENTS this year... Yeah, I'll go into detail on that in just a minute) so the only thing that has been working is the dreaded TIME. OUT. <insert evil laughter and freaky music for effect> J, on the other hand, is 4 and believes so deeply that I only need to make a threat once and he behaves. Now, I DO realize presents are not the true meaning of Christmas, but I'm telling YA, after constantly telling them no! Sit down! Your brother is not a punching bag! DON'T give that to the dog! Stop rolling around on the floor! EAT. YOUR. FOOD. ... You kind of have to resort to trickery if you want to survive. 

Back to J-man:
We got the Toys -R- Us catalogue in the mail (fantastic marketing, by the way) and I decided it would be easier to look through it first, before giving it to J. It back fired. I wrote his letter on top of certain pages and he was only allowed to circle items from the pages with his letter on them. While I was busy patting myself on the back for my intelligence, he was busy circling away. He circled E V E R Y item. Then he went back and wrote his letter on other pages and circled those items too. THEN, he wanted the first letter of mine, my husband's and the baby's so he could circle items for us too. The whole darn book is useless now bc I can't read anything... Everything is circled!!

Smh. I have him a marker and he went all ape-$=!t crazy on me. In all honesty, it was hilarious bc this whole event was spread out over the course of a week. So he would probably go to school, hear one of his friends say something and come home and say he wanted it too. And his memory is amazing. To the point of it being annoying bc he recalls events in such clarity that when I try and beat around the bush on an answer to something, he'll say, "no no no! Remember THIS is what happened". And he's usually right. 

So the girls in his class have been talking about Barbies. (I loved Barbies. I let J play with MY Barbies when we were at my dad's house, but he used their poor bodies as drum sticks and weapons so his privileges were revoked.) Anytime a Barbie commercial comes on, without fail, J will say, "ewwww gross! Barbies! I hate Barbies"... That was until the Curl and Style Barbie (or whatever she is called) came on TV. You can curl her hair with a wand and rollers and then brush it straight again. Magic. 

He makes sure to say his normal line of awful things about Barbies, but for her, he tells me he is buying me that for Christmas. At first he said it was bc I needed a girl (thanks, mom. I know you put him up to it) but then changed his tune when I said I didn't need it. "But I need it!" AHA! Barbie truly is amazing!!

Hahahaha

So now I have to shop online for that damned Barbie bc I really don't want to go Black Friday Shopping... unless it's to Michael's. 


Sunday, September 28, 2014

Happy Harvest Pumpkin Spice Mini-Cupcakes with Graham Cracker Crust and Pumpkin Spice Frosting

These mini cupcakes take a little time to make, but are sooooo worth it....

First, let me say that I made waaaaaaay too many and these little suckers are waaaaaaay too delicious to just eat one. THIS is my prime reason for working out as much as I do... So I can eat crap like this and not feel too guilty. Hell, I'd probably not feel guilty EVER for eating this dessert. It's THAT good. Sorry for not including a little story of our day, but I have the memory or Dory (sp?) and don't want to forget how I made these. (Yeah, I made it up... Lol if you want to, but I'm getting much better at baking so my confidence has sky-rocketed)

These mini-cupcakes are lined with a graham cracker crust. To make this, you'll need:

GRAHAM CRACKER CRUST: (oven at 300°)
7-8 CINNAMON graham crackers (go to Aldi's...it's $2 or less for a box)
6 Tbs unsalted butter: melted (I like challenger butter, but any unsalted butter will do)
1/4 cup sugar

My big helper is breaking apart the graham crackers in our food processor. Next, add the sugar. You'll turn on the food processor and mix the two ingredients together until it resembles sand. Slowly add the melted butter and pulse. 
It'll look and feel like brown sugar. 
You'll want to butter the bottoms of the cupcake tin (just use your finger or you can actually use the left over butter to wipe the bottoms. It doesn't need much). Then use a small spoon (as you can see, I'm using the toddler spoon, which works very well... So if you happen to HAVE a toddler spoon like this, go ahead and use it. Otherwise you're S.O.L.... Kidding, you'll be fine; use a tsp-size measuring spoon), scoop out a little of the mixture, place it in each of the tins and use the back of the spoon to push it into the bottom. You might want to also use your fingers--- nothing's worse than a crumbly crust!! Lol. (And don't toss out the extra... You'll use it for the topping)

Place in a preheated oven (300°) for 6 minutes. Remove, let cool. 

While that's baking, let's get to the cupcake...
PUMPKIN SPICE CUPCAKE: (oven at 350°)
1 box spice cake mix
3 eggs
1 can pumpkin purée 
1/4 cup water

I don't know why I always do this, but I do... I ALWAYS mix my wet ingredients together first. Actually, I do know why I do this--- bc I feel like it makes my cakes/muffins extra moist. So put the eggs in the bowl first and beat the hell out them. (I know you've got it in ya...) Then add the water and beat some more. Add in the pie filling and stir until it is very well blended. Now, here's where it gets a little crazy... Take your cake mix and shake it up. I'm serious. Shake it. (If you choose to add in some sweet dance moves of your own while doing this, more power to ya. I can dance; so I did, but y'all aren't ready to see me on my game yet. It'll happen though.) Add in the cake mix and blend until just moistened. There might be a couple of clumps and that's ok. Use a small spoon (not the toddler-sized spoon) and spoon mix on top of the graham cracker crust. (You do not need to spray the tins again... ) You'll want to fill these almost to the top- they will not spill over.

Bake at 350° for 10 min. (If you are making regular-sized cupcakes, add additional 5 minutes then check on them) When in doubt, use a toothpick to check it's done-ness (wow, super awesome words today). If it comes out with batter still on it, add another minute. *Remember, you can ALWAYS add time, but you can never take it away!!!

Let cool for about 5-10 minutes, then use a toothpick to pull them out. 
If you're on a diet (ha, aren't we all...) you can stop here. They taste just as delicious without the cream cheese frosting. 


But if you're like my family and "need" frosting... Continue reading...

PUMPKIN SPICE CREAM CHEESE FROSTING
1/2 cup unsalted butter: room temperature
8 oz pumpkin spice cream cheese: room temperature (I found this gem at ALDI's of all places!)
2 tsp vanilla extract (yes, I am a vanilla snob and I love this brand of vanilla)
4 cups powdered sugar

You can do this with a hand mixer, but my husband is Italian and comes from a long line of excellent cooks, so... We have kitchen appliances out the wa-zoo... No complaints here...
 Add cream cheese and butter to your mixer and pump up the speed to 8-9 until it is completely mixed. Slow the speed way down to a 2-3 and add your vanilla. Add powdered sugar in 1/2 cup increments (unless you enjoy cleaning up powdered sugar from your cabinets, counters, ears, hair... You get the picture. It MIGHT have happened when I first started cooking... Hypothetically of course) using the slowest speed. 

All that's left is a taste-tester... I have 3. And they all approved... Ok now FROST THOSE CUPCAKES!! And if you have extra graham cracker crust mix, sprinkle that on too. Tastes great. Oh, and it looks great too. 

This recipe makes 48 mini cupcakes. "But Becca," you say,"there are only 45 cupcakes.. Why is that?" Well, reader, this is because my husband is incapable of waiting to eat desserts. Yes, I realize he's complimenting my cooking skills, but damn it- it's infuriating sometimes. Ah, c'est la vie. 

Here's the finished result:

Crap, these things are addicting. At least now I have a "go-to" dessert for pretty much any occasion. I never believed pumpkin-flavored items should only be reserved for fall...

In case you want to print out this recipe, here it is in full:


Happy Harvest Pumpkin Spice Cupcakes with Graham Cracker Crust and Pumpkin Spice Frosting:

GRAHAM CRACKER CRUST: (oven at 300°)
7-8 CINNAMON graham crackers (go to Aldi's...it's $2 or less for a box)
6 Tbs unsalted butter: melted (I like challenger butter, but any unsalted butter will do)
1/4 cup sugar

Preheat oven. Blend graham crackers and sugar in a food processor until it resembles sand. Add melted butter slowly and pulse mixture (it will look and feel like brown sugar). Lightly butter the bottom of each muffin tin and spoon in mixture, making sure to press firmly. Bake for 6 min. Let cool. 

PUMPKIN SPICE CUPCAKE: (oven at 350°)
1 box spice cake mix
3 eggs
1 can pumpkin purée 
1/4 cup water

Preheat oven. In a medium-sized mixing bowl: beat eggs. Add water and beat again. Add pie filling and mix very well. Shake the cake mix before adding it to the bowl. Mix just until blended (batter will be slightly lumpy). Do not butter again. Spoon the cake mixture into the tins and fill to the top. Bake for 10 min. Let cool. Use toothpicks to get the muffins out. 

PUMPKIN SPICE CREAM CHEESE FROSTING
1/2 cup unsalted butter: room temperature
8 oz pumpkin spice cream cheese: room temperature (I found this gem at ALDI's of all places!)
2 tsp vanilla extract (yes, I am a vanilla snob and I love this brand of vanilla)
4 cups powdered sugar

In a stand mixer with the paddle attachment (or hand mixer), combine butter and cream cheese on medium-high setting. Slow speed to low and add vanilla. Once combined, add powdered sugar in 1/2 cup increments on low speed. Frost cupcakes. Top with left over graham cracker crust mixture. 


Plan on eating about 3 in one sitting and TALK about going to the gym later. The gym is a 12-step process and talking about it is step 1. Good luck ;)